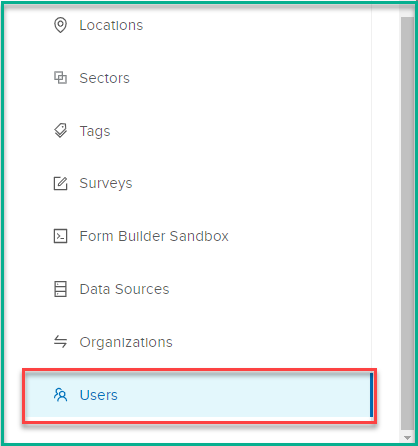
Users
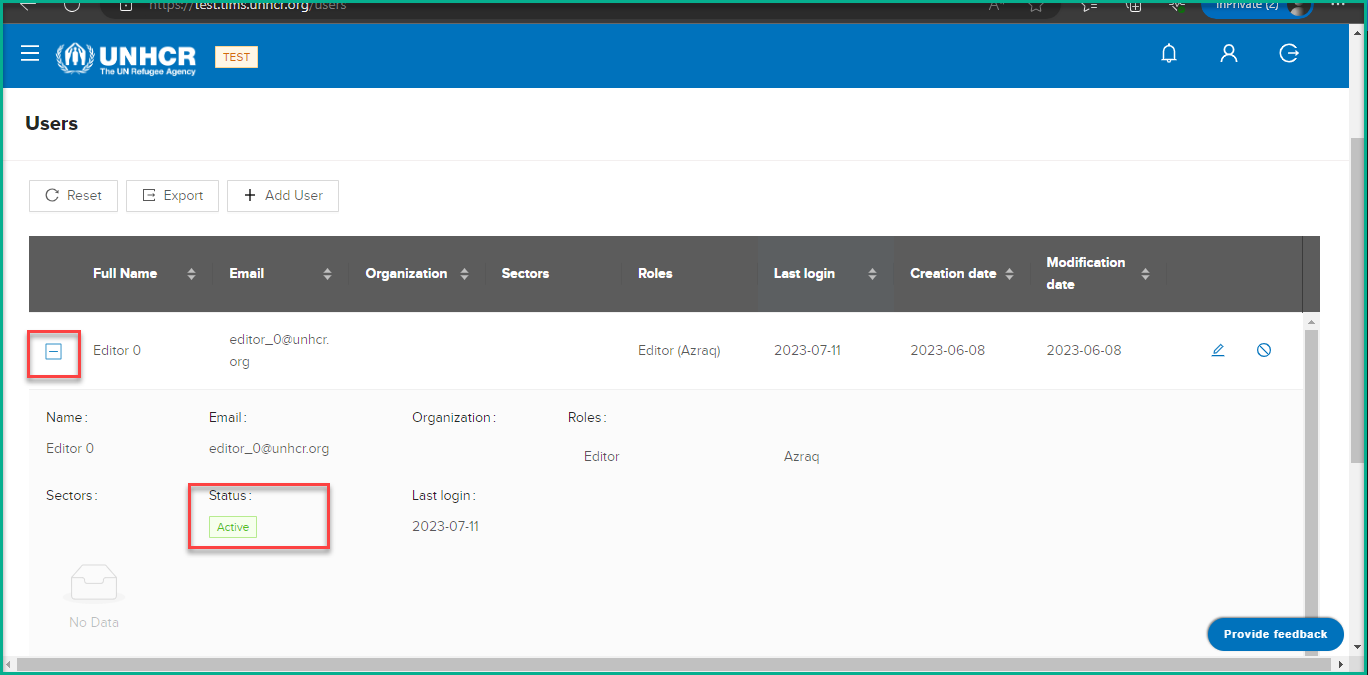
The Users Management page provides you with essential details about each user, including their Full Name, Email, Status, Roles, Locations, Sectors, Organizations, Last login, Creation date, and Modification date. You can quickly review user data at a glance and take necessary actions as required.such as adding, updating, activating, and deactivating user accounts seamlessly.
Adding New Users
What : Adding New Users
Who : Global Admin
How :
-
Go to https://test.tims.unhcr.org/ in your web browser.
-
Log in as a global admin user.
-
Navigate to the "Users" page.
- Click on the "Add User" button.This action will open a dialog box labeled "Add User."

-
Fill in the required data for the new user:
User Account Information
-
Name : Enter the user's full name. Ensure that this field is not left empty.
-
Email : Provide the user's email address. It should be a valid and unique email address for the user.
-
Organization : Select the organization to which the user belongs.
-
Sectors : Choose the sector(s) applicable to the user's role
-
Roles : Assign the appropriate role(s) to the user based on their responsibilities. Each sector may have different roles associated with it , For Country Admin and Editor roles . Ensure that at least one country or one site is selected.
-
-
After providing all the necessary information, click the "Submit" button to save the user's details and create the new account.
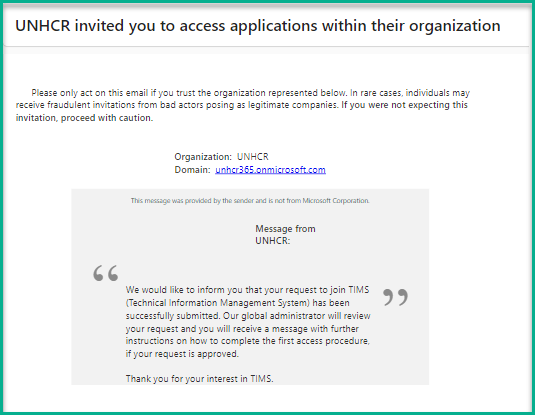
Upon submission, the user will receive a notification to log in to the TIMS system using their account .
Note: As a Global Admin, you have the authority to add new users and assign roles within the platform. Ensure that all mandatory fields are filled in correctly to successfully create the user account.
Approving Users Registered from Signup Page
What : Approving Users Registered from Signup Page
Who : Global Admin
How :
-
Open your web browser and go to https://test.tims.unhcr.org/.
-
Sign in to the TIMS platform using your Global Admin credentials.
-
Once logged in, navigate to the "Users" page, which displays a list of all registered users and their details.
-
In the Users page, use the filter option to show only users with "Pending" status. This will help you find the users who have registered through the signup page but have not been approved yet.
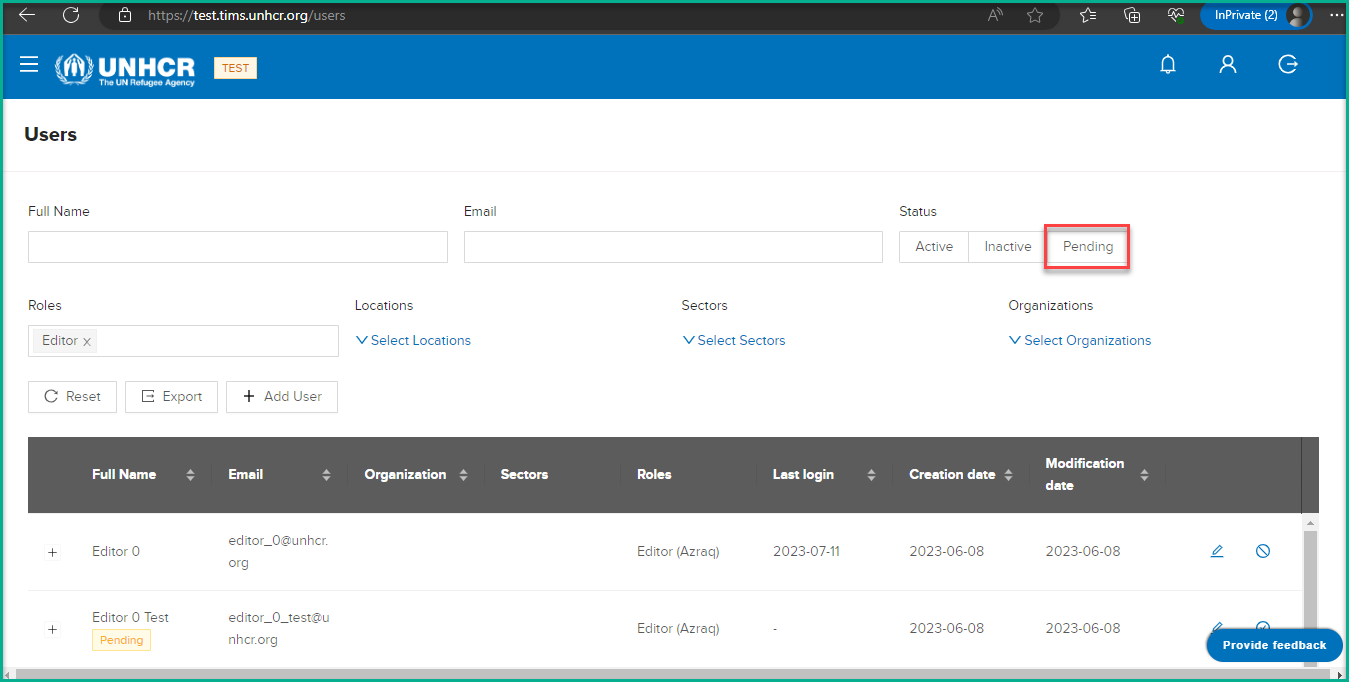
-
Review the list of users with pending status, and select the user account you wish to approve by clicking on it to view its details.
-
After selecting the user, you will see an "Activate" button. Click on the "Activate" button to proceed with the approval process for the selected user.
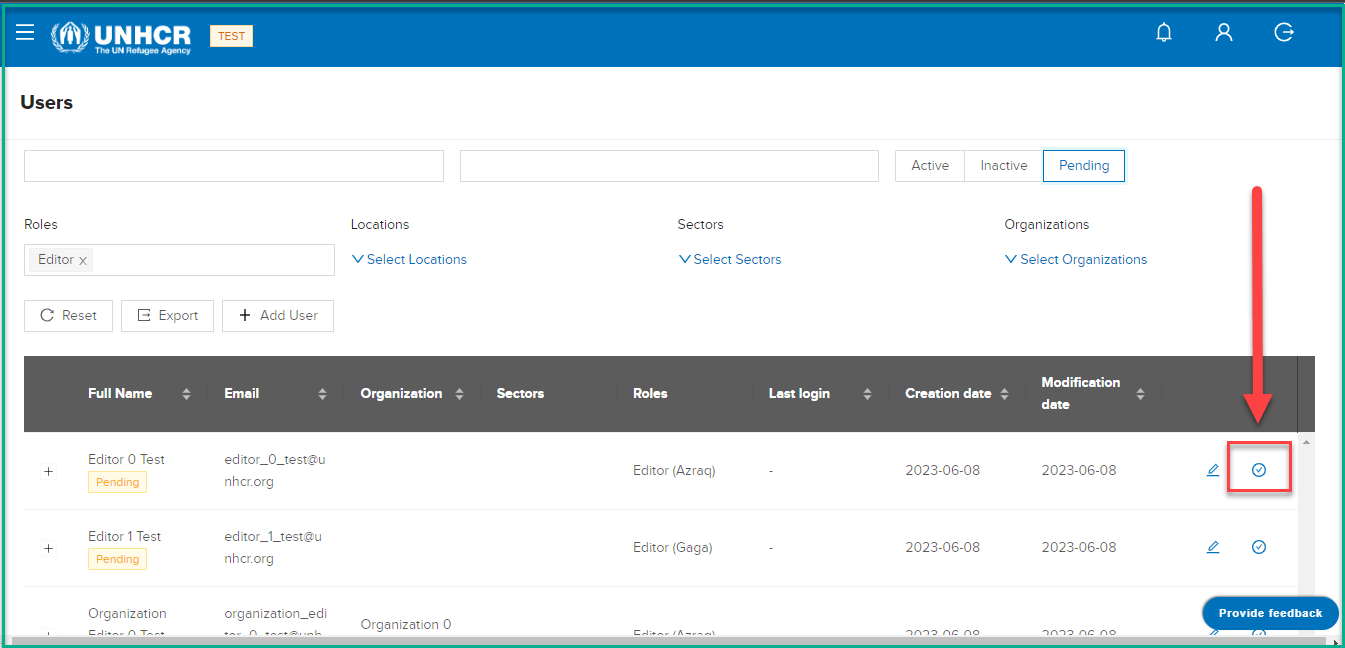
- A confirmation prompt will appear, asking "Are you sure to change users status?". Confirm your decision by clicking "Yes" in the prompt. This action will activate the user's account, and they will receive a notification email informing them that they can now start using the TIMS system.
- Once the approval process is completed, the user's status will change from "Pending" to "Active," indicating that they can now access and use the system.
Filter
The "Filter" function on the Users page empowers Global Admins to efficiently search and narrow down the list of users based on specific criteria. This feature streamlines user management by allowing you to find the exact users you need quickly.

Here's how you can use the different filters:
Full Name: Filter users by their full names. Enter the name you are looking for, and the system will display users matching that name.
Email: Search for users using their email addresses. Enter the email you want to filter, and the system will show the corresponding user(s).
Status: Choose from the options: "Active," "Inactive," or "Pending." This helps you find users based on their account status.
Roles: Filter users by their assigned roles. You can choose from options like "Global Admin," "Country Admin," "Editor," "Viewer," or "Technician."
Locations: Select specific locations from the available list. This filter helps you find users associated with particular geographical areas.
Sectors: Choose from various sectors, such as "WASH," "Energy," "Shelter," "Settlement," or any other sectors available in the system. This filter allows you to find users based on their areas of expertise.
Organizations: Select from the list of organizations registered in the system. This filter enables you to find users affiliated with specific organizations.
Updating Users
What : Updating Users
Who : Global Admin
How :
- Click on the "Edit User" icon .This action will open a dialog box labeled "Edit User."
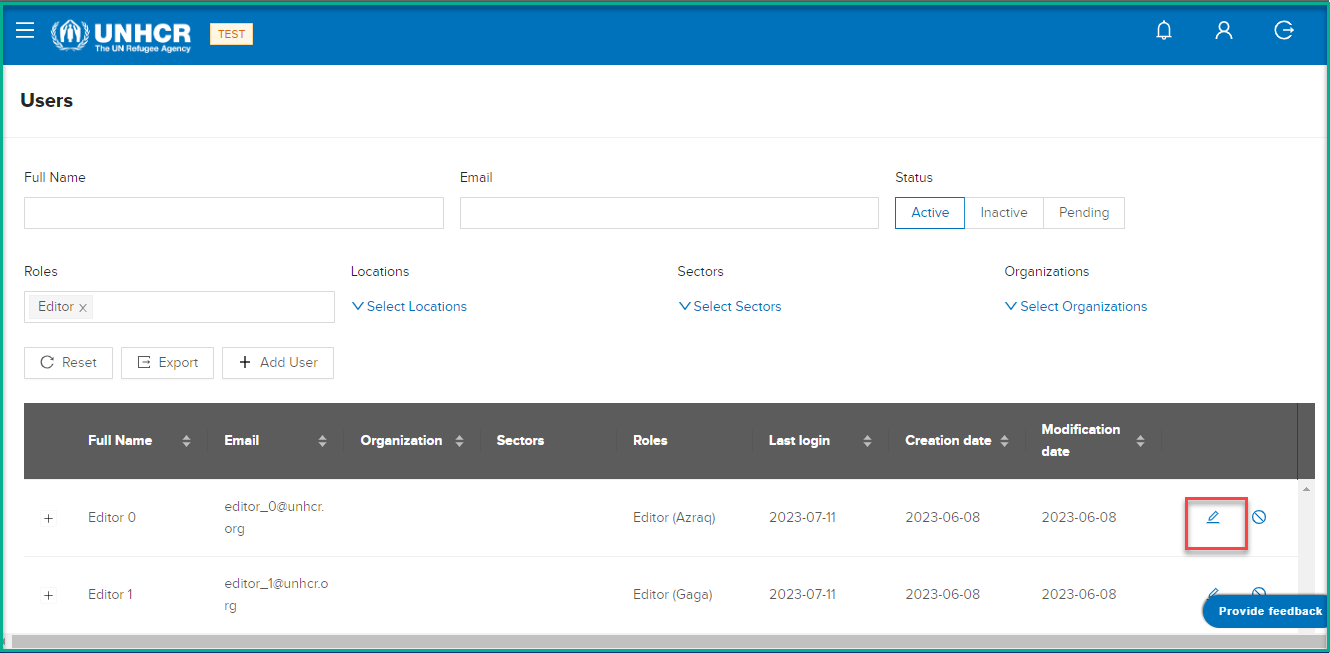
- In the "Edit User" dialog box, you will see various fields containing the user's information, such as Name, Email, Sectors, and Roles.

-
Make the necessary changes to the user's details. For example, you can update the user's Name,select different Sectors they are associated with, or change their Roles.
-
After making the desired changes, click on the "Submit" button to save the updated user information.
Activate/Deactivate Users
What : Activate/Deactivate Users
Who : Global Admin
How :
-
Locate the user you want to activate or deactivate. You can use the search or filter options to find the specific user.
-
Check the user's status to determine if they are active or inactive. If the user is already active, the "Deactivate" button will be visible, and if they are inactive, the "Activate" button will also be available.
- Click on the "Activate" button for the user you want to change the status.
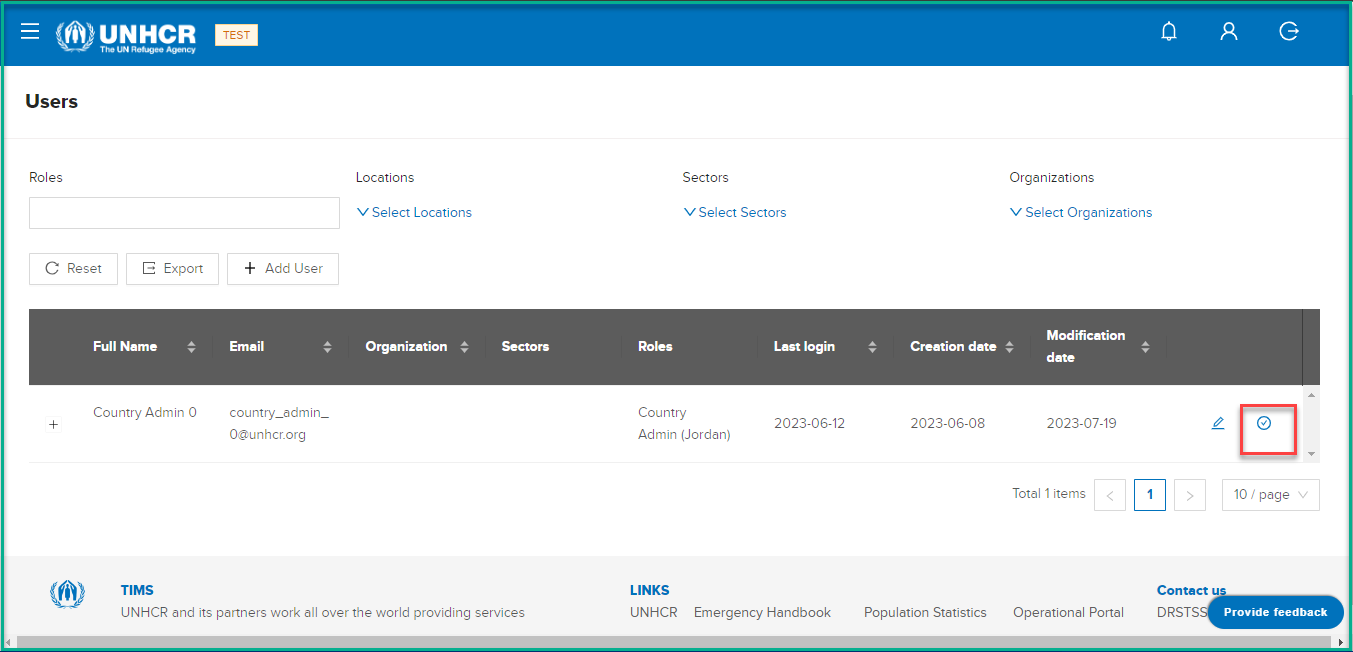
-
A confirmation message will appear, asking if you are sure you want to change the user's status.
-
Click "OK" to confirm the action.
-
The user's status will be changed accordingly. If you activated an inactive user, their status will now be "Active," and if you deactivated an active user, their status will now be "Inactive."
Export Users Data
What : Export Users Data
Who : Global Admin
How :
-
Go to the Users Management page by signing in as a Global Admin at https://test.tims.unhcr.org/.
-
On the Users Management page, you will see a table displaying user data with columns such as Id, Email, Name, Roles, Location, Status, and Last Login.
-
If you want to export specific user data based on certain criteria, you can use the search or filter options to refine the list of users displayed in the table. Please note that the export will reflect the data visible on the UI after applying any search or filter.
-
Once you have the desired user data displayed on the table, click on the "Export" button.
-
The system will generate an XLS file containing the user data that is currently visible on the table.
-
The exported XLS file will contain the columns: Id, Email, Name, Roles, Location, Status, and Last Login, with each row representing a different user's information.
-
If there are multiple pages of users, pagination controls may be available to control how many users' data you want to export at a time. You can navigate through the pages to export data from different pages.
-
Save the exported XLS file to your local system for further use or analysis.